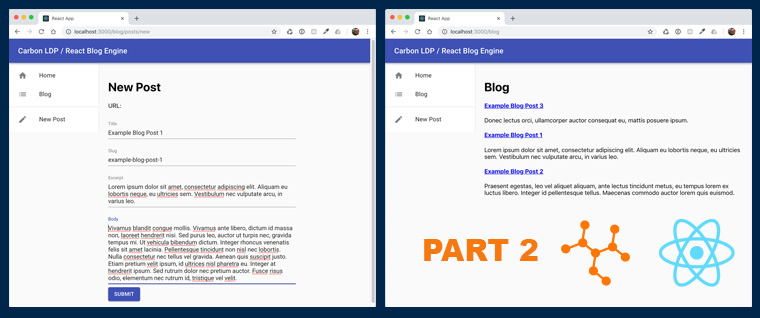
In this tutorial series we are demonstrating how you can build a blog engine with Carbon LDP™ and React. Carbon serves as our data layer and React is the library we’re using for building the user interface.
In Part 1, we set up the front-end with React and we created a simple blog post input form that looks like this:
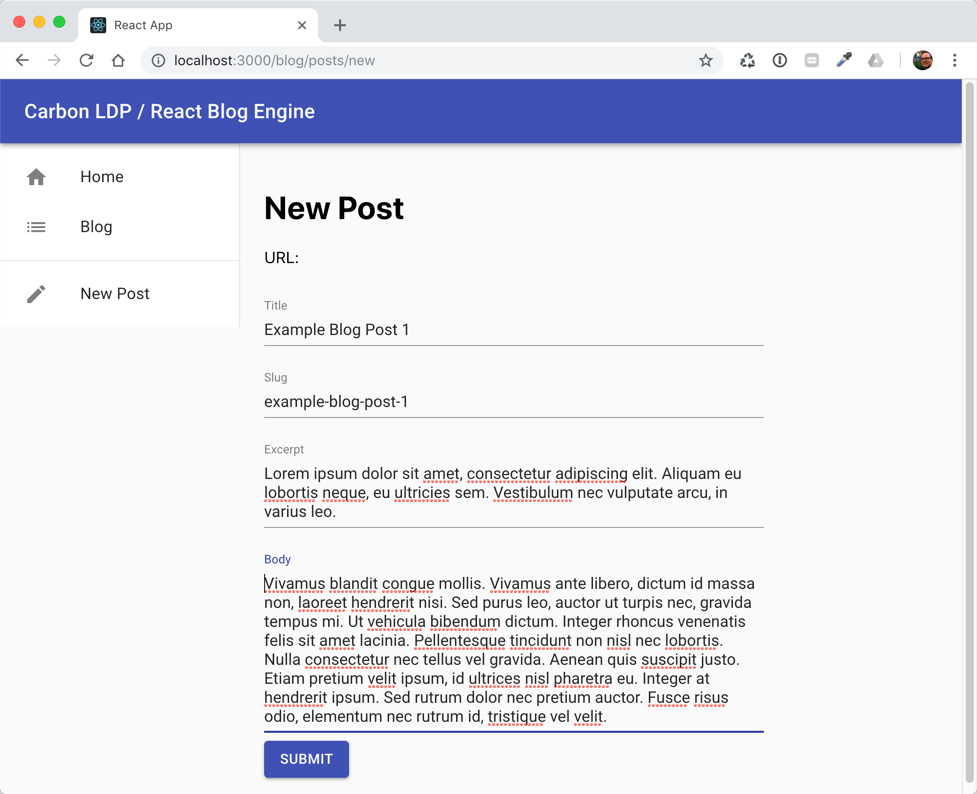
Complimentary source code for this tutorial can be found in the GitHub repo, carbonldp-react-blog.
Today, in part 2, we’ll update the editor component so that it actually persists the blog post data to Carbon.
Setup your local development environment with Carbon LDP and the Workbench
To complete this exercise, you will need to have a local instance of Carbon LDP (the platform / server) and the Carbon LDP Workbench. It’s pretty easy to do, if you haven’t done it already. In a nutshell, the setup requires that you:
- Install and run Docker
- Create a home directory for the platform’s data
- Download and run a Platform instance (a Docker container)
- Download and run a Workbench instance (another Docker container)
For more detailed instructions on how to complete the setup, please refer to the Quick start guide found in the product documentation. The setup is quite straightforward, however, so we’ll provide a quick recap here. If you already have the Carbon Platform and Workbench installed, you can skip the remainder of this section.
Install and run Docker
We’ll assume that you already have Docker installed and running on your local machine. If you do not, please refer to the guide, Get Started with Docker.
Create a home directory for the platform’s data
Create an empty data directory for Carbon LDP on your local machine. For example, I created mine in my user home path as shown below:
/Users/cburleson/carbonldp
Download and run a platform instance
Prepare the Docker command that follows before executing it:
docker run -d --name carbonldp-platform -p 8083:8083 \
    -v /your/directory/path/carbonldp:/opt/carbonldp/shared \
    carbonldp/carbonldp-platform:5 \
        --carbonldp.contact.first-name="" \
        --carbonldp.contact.last-name="" \
        --carbonldp.contact.email="" \
--carbonldp.contact.company=""- Replace
/your/directory/path/carbonldpwith the absolute path to the directory you just created. Leave the portions after the colon near the path intact (:/opt/carbonldp/shared). - Complete the contact information (last three lines)
- Note: If you’re on a Windows machine, you must remove the back-slashes and bring everything together on one line.
Now, execute the command in a terminal or command prompt. The Carbon container will be downloaded from Docker Hub and and instance will be started. You can then verify the carbonldp-platform instance is running with the docker ps --all command. If you point your web browser to http://localhost:8083/.system/platform/, you should also receive an XML response from the server.
Download and run the Carbon LDP™ Workbench
The Workbench is an administrative tool that provides a user interface to the data we store in Carbon. We’ll be using it for convenience to create a parent document to store our blog posts under and to validate that data is properly saved.
Execute the following command to download the Workbench and spin up its container:
docker run -d --name carbonldp-workbench -p 8000:80 \
        -e "CARBON_HOST=localhost:8083" \
        -e "CARBON_PROTOCOL=http" \
        carbonldp/carbonldp-workbench:5
Again, if you’re running Windows, remove the back-slashes and bring everything up on one line before executing the command.
You can verify the carbonldp-workbench container is running with the Docker command, docker ps --all. You can also load the Workbench in your web browser at http://localhost:8000.
And that’s it! The Carbon Platform and Workbench are up and running. Again, you can refer to the Quick start guide for more details about this procedure.
Install the JavaScript SDK
Although Carbon exposes a REST API for reading and writing data, that’s a little too low level for rapid development. Luckily, there’s a JavaScript SDK which simplifies development with frameworks like React (and Angular, Vue, Ember, name your framework).
To install the SDK into your project, simply execute the following command from within the project’s directory.
npm install carbonldp --saveNow that we have Carbon and the Workbench running, we can manually create a parent document under which all blog post documents can be stored. In Carbon, a parent document acts as a container for child documents. You can think of the parent document pretty much like a folder helping us to organize where data goes. Now, we could also create this container programmatically with the SDK, but by creating it manually, we’ll see how convenient the Workbench can be to the early development process.
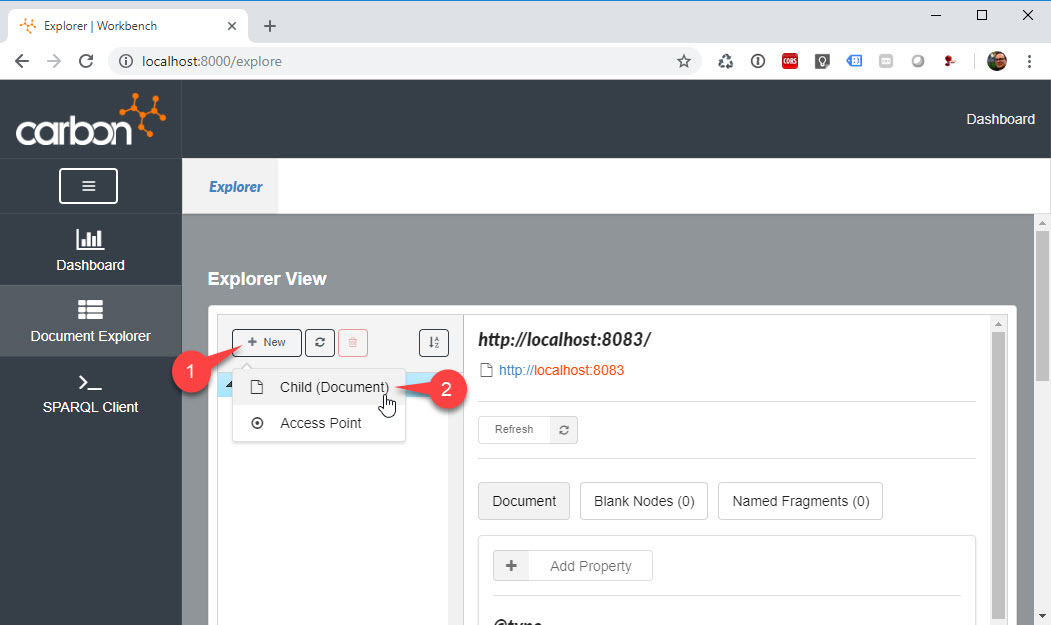
In your web browser, navigate to the Workbench’s Document Explorer view at http://localhost:8000/explore and click New > Child (Document) as shown below.
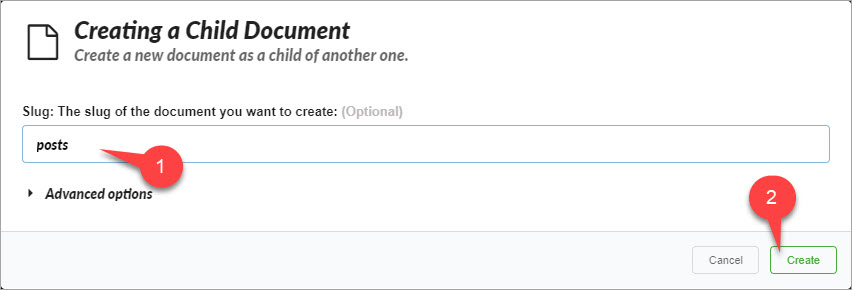
Enter posts in the Slug field and then click create as shown below. The slug is the name that will be used to identify the document in the Document Explorer and in the URI that will be minted for the new resource.
Once you’ve created the posts/ document, you can double-click it in the Document Explorer to see some of its attributes in the panel to the right of the tree control. Notice in the screenshot below, the slug is used to create the fully qualified URI for the document.
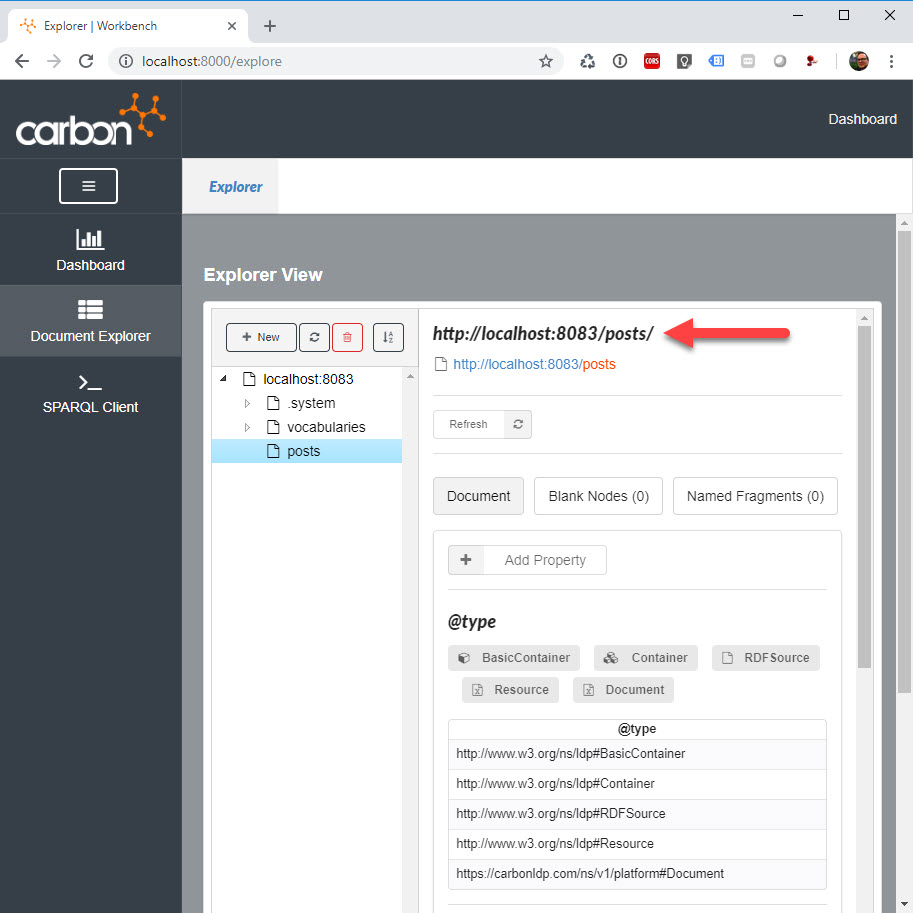
So, what the heck is all that other stuff in the right panel? Basically, it’s just a visual representation of the data document the server created using the RDF data model and Linked Data Platform conventions. You don’t have to understand RDF or Linked Data concepts to build React apps with Carbon. If you learn more about these technologies in the future, however, you will begin to see how Carbon can help you link data within your app and with others to create a knowledge graph. Enter the document’s URI in your web browser and you will see the raw document in RDF-XML as shown below.
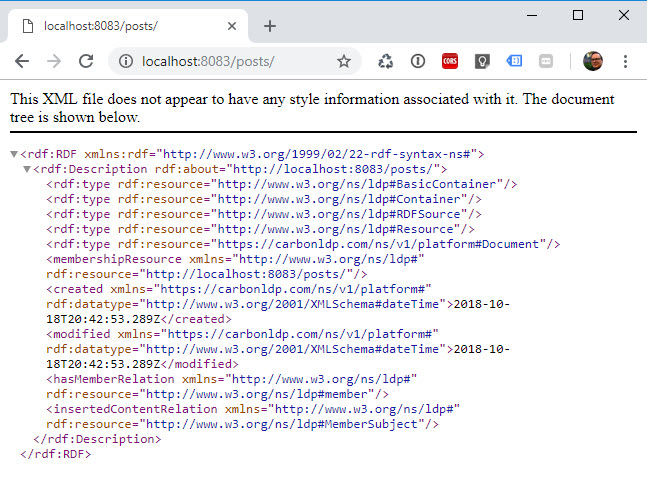
Don’t let the XML scare you; you won’t have to parse it. Carbon’s JavaScript SDK does all the work of converting the RDF data to and from JavaScript objects so that you don’t have to! We’ll soon demonstrate this by saving new blog posts.
Update the blog post Editor to save data
Now we can use the SDK in the Editor component to save blog posts as children of the posts/ document that we created with the Workbench. First, however, let’s examine some of the code we have in the Editor component that we created in Part 1 of this tutorial.
Open src/editor/index.js, and take a look at the following stanza:
handleChange = name => ({target: {value}}) => {
    this.setState({
        post: {
            ...this.state.post,
            [name]: value
        }
    })
    if (name === 'title') {
        let friendlySlug = this.makeFriendlySlug(value)
        this.setState(() => ({
            post: {
                title: value,
                slug: friendlySlug
            }
        }))
    }
}
As the user fills out the title of the blog post, we automatically generate a URL friendly suggested slug. The user can keep the recommended slug that’s generated from the blog post title or change it. This makes use of the makeFriendlySlug method in the same class, which looks like this:
makeFriendlySlug(str) {
    // \W represents any nonalphanumeric character so that, for example, 'A&P Grocery' becomes 'a-p-grocery'
    let friendlySlug = str.replace(/\W+/g, '-').toLowerCase();
    // If the last char was nonalphanumeric, we could end with a hyphen, so trim that off, if so...
    if (friendlySlug.substring(friendlySlug.length - 1) === "-") {
        friendlySlug = friendlySlug.substring(0, friendlySlug.length - 1);
    }
    return friendlySlug;
}
The makeFriendlySlug method takes a given string and makes it URL friendly. It ignores nonalphanumeric characters, replaces spaces with hyphens, and makes everything lower case.
Import the Carbon object
In the same file (src/editor/index.js), we can now import the Carbon object and initialize it as follows:
import { CarbonLDP } from "carbonldp/CarbonLDP";
let carbonldp = new CarbonLDP( "http://localhost:8083" );
Persist the submitted blog post to Carbon
Next, we need to update the handleSubmit method to be as follows. To keep this tutorial simple for now, we’ve not included code for form validation.
handleSubmit = () => {
    // TO DO: validate form

    let blogPost = {...this.state.post};

    carbonldp.documents.$create("posts/", blogPost, blogPost.slug).then(
        (blogPost) => {
            // JavaScript object is now saved in Carbon; log the document's minted URI...
            console.log(blogPost.$id);
            let post = {...this.state.post, $id: blogPost.$id};
            this.setState({post});
        }
    ).catch(error => console.error(error));

}
So, what’s going on here?
First, we make a shallow copy of the state object as blogPost. This is simply because, in React, state is immutable and should only be changed through React’s setState() function. As soon as we persist the blogPost object, Carbon will return a similar JavaScript object representing the persisted document. When that object comes back from Carbon, it will have the $id attribute populated with the fully qualified URI of the document, which ends with the slug chosen by the user. It will also have a number of new Carbon-specific convenience methods applied to it, which make it easier to continue to use the object with the Carbon server.
We use carbonldp.documents.$create("posts/", blogPost, blogPost.slug) to persist the blog post.
- The first parameter to the
$createmethod specifies the parent document under which we wish to save the blog posts,
which is the relative URI to the parentposts/document that we created manually in the Workbench. - The second parameter is the actual blog post object (JavaScript object) that we wish to persist as a child of the
posts/document. - The final parameter, which is optional, is the slug that we want the server to use when minting a URL for the newly created document. If we did not provide a preferred slug, Carbon would generate one automatically, which would give the document a less friendly URI and make it more difficult to identify.
Finally, we use React setState() again to set the $id of the newly created document. That’s just in case we care to use it in the UI later – to confirm the submission to the user, for example.
Here’s the complete code for the src/editor/index.js file at this point:
import React, {Component} from 'react'
import {withStyles} from '@material-ui/core/styles'
import {Button, TextField} from '@material-ui/core'

import {CarbonLDP} from "carbonldp/CarbonLDP";

let carbonldp = new CarbonLDP("http://localhost:8083");

const styles = theme => ({
    FormControl: {
        width: 500
    },
    xsFormControl: {
        width: 100
    }
});

class Editor extends Component {

    state = {
        post: {
            $id: '',
            title: '',
            slug: '',
            excerpt: '',
            body: ''
        }
    };

    handleChange = name => ({target: {value}}) => {
        this.setState({
            post: {
                ...this.state.post,
                [name]: value
            }
        })
        if (name === 'title') {
            let friendlySlug = this.makeFriendlySlug(value)
            this.setState(() => ({
                post: {
                    title: value,
                    slug: friendlySlug
                }
            }))
        }
    }

    /**
     * Takes a given string and makes it URL friendly. It ignores nonalphanumeric characters,
     * replaces spaces with hyphens, and makes everything lower case.
     * @param {*} str
     */
    makeFriendlySlug(str) {
        // \W represents any nonalphanumeric character so that, for example, 'A&P Grocery' becomes 'a-p-grocery'
        let friendlySlug = str.replace(/\W+/g, '-').toLowerCase();
        // If the last char was nonalphanumeric, we could end with a hyphen, so trim that off, if so...
        if (friendlySlug.substring(friendlySlug.length - 1) === "-") {
            friendlySlug = friendlySlug.substring(0, friendlySlug.length - 1);
        }
        return friendlySlug;
    }

    handleSubmit = () => {
        // TO DO: validate form

        let blogPost = {...this.state.post};

        carbonldp.documents.$create("posts/", blogPost, blogPost.slug).then(
            (blogPost) => {
                // JavaScript object is now saved in Carbon; log the document's minted URI...
                console.log(blogPost.$id);
                let post = {...this.state.post, $id: blogPost.$id};
                this.setState({post});
            }
        ).catch(error => console.error(error));

    }

    render() {

        const {post: {$id, title, slug, excerpt, body}} = this.state,
            {classes} = this.props

        return (
            <div className="Editor">
                <h1>New Post</h1>
                <p>URL: {$id}</p>
                <form>
                    <TextField
                        label="Title"
                        value={title}
                        onChange={this.handleChange('title')}
                        margin="normal"
                        className={classes.FormControl}
                    />
                    <br/>
                    <TextField
                        label="Slug"
                        value={slug}
                        onChange={this.handleChange('slug')}
                        margin="normal"
                        className={classes.FormControl}
                    />
                    <br/>
                    <TextField
                        label="Excerpt"
                        multiline
                        rowsMax="5"
                        value={excerpt}
                        onChange={this.handleChange('excerpt')}
                        margin="normal"
                        className={classes.FormControl}
                    />
                    <br/>
                    <TextField
                        label="Body"
                        multiline
                        rowsMax="10"
                        value={body}
                        onChange={this.handleChange('body')}
                        margin="normal"
                        className={classes.FormControl}
                    />
                    <br/>
                    <Button
                        variant="contained"
                        color="primary"
                        className={classes.button}
                        onClick={this.handleSubmit}>Submit</Button>
                </form>
            </div>
        );
    }
}

export default withStyles(styles)(Editor);
If you run the app now using npm start, you should now be able to create a new blog post using the editor.

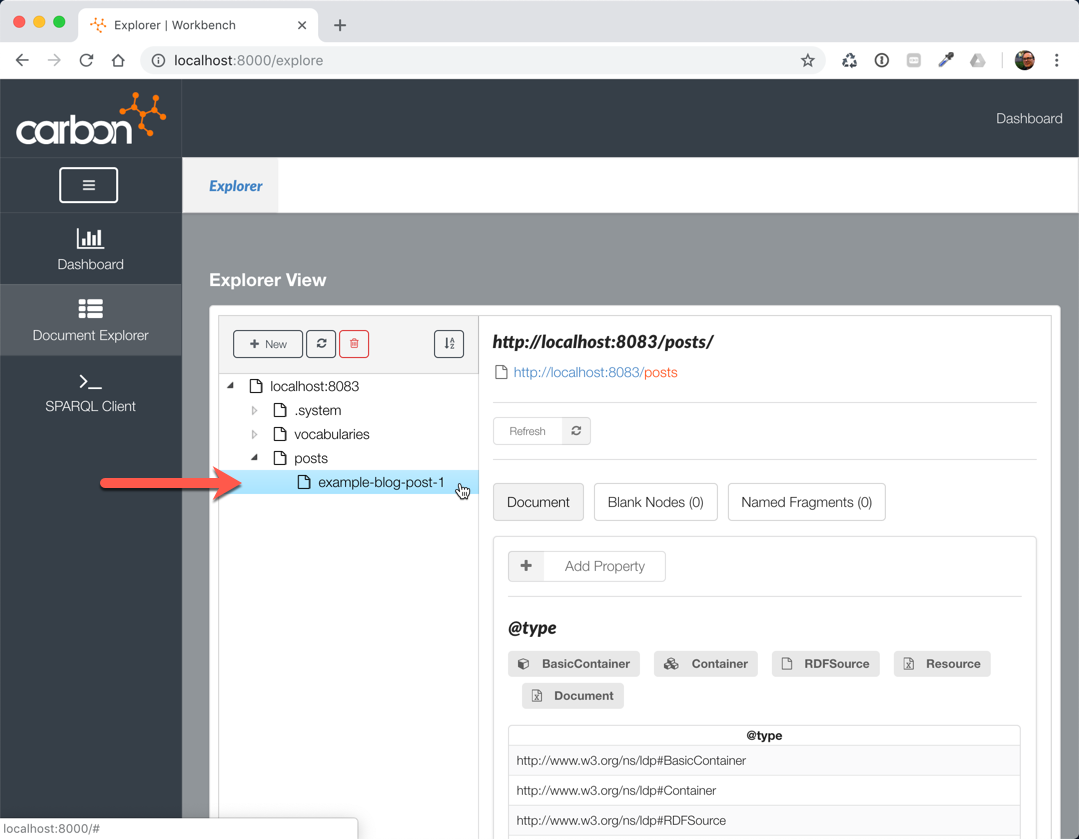
Of course, at this point, we haven’t yet created anything to show the saved post, but after you press Submit, you’ll be able to find it in the Workbench under the posts/ document as shown below.
In keeping with our practice of committing at stable checkpoints, we’ll commit here with the following message:
Commit: Update blog post Editor to persist posts into Carbon
Wrap up
In this tutorial series we’ve been demonstrating how to build a simple blog engine with Carbon LDP and React. Today, we integrated Carbon and modified the blog post editor so that it actually persists new blog posts as Carbon documents. We:
- Setup our local development environment with Carbon LDP™ and the Workbench
- Installed Carbon’s JavaScript SDK
- Created a parent document in the Workbench to store child blog post documents
- Updated the blog post Editor to save data
Our simple blog post form now saves data in Carbon when submitted. In Part 3, we’ll demonstrate how to list the blog posts on the Blog page with links for reading each blog post. Stay tuned!
